Uploading and Downloading Files To/From the EX FTP Server Using FileZilla
Follow the instructions below to upload or download files to the EX FTP server.
Download Files from the EX FTP Server to Your Local Computer Using FileZilla
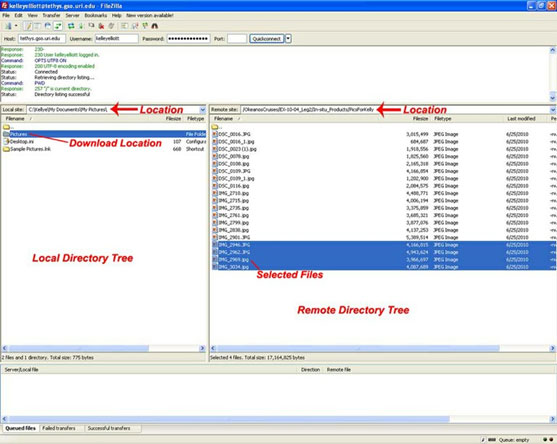
- Connect to the FTP site
- Navigate to the location you wish to download the files to on the local directory tree
- Navigate to your desired location on the remote directory tree
- Select the files you wish to download from the remote directory tree
- Left click your mouse and “hold” down
- Drag the files to your desired location on your local directory tree
- Release the left-button on your mouse to “drop” the files into your remote directory tree
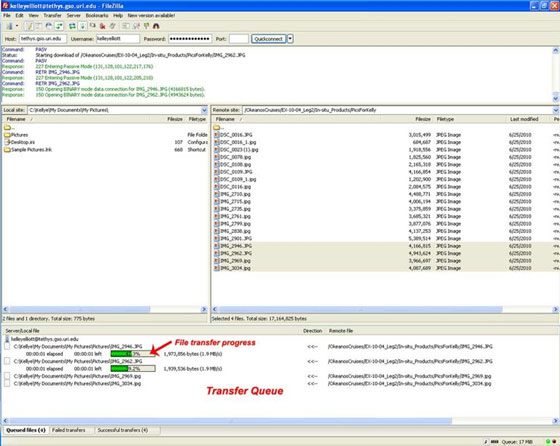
You can monitor the status of your files as they download in the transfer queue window.
Upload Files from Your Local Computer to the EX FTP Server Using FileZilla
All cruise participants may upload items to the UPLOAD folder with the cruise folder. Appropriate types of items include background datasets, maps, images, related articles, papers and publications, and other reference materials and documents. Uploading files must be done from an FTP client; you can not use web browser access to the FTP site for uploading.
All items in the UPLOAD folder will be downloadable by all other cruise participants and should be considered as public. This folder should NOT be used as a mechanism to distribute private or proprietary information as OER has no control over how cruise participants may use any items stored in the UPLOAD folder.
Following a cruise, any materials left in the UPLOAD folder may be added to the cruise archive. Again, please do NOT upload private or proprietary information to the UPLOAD folder.
Not all users have permission to upload files to other folders on the EX FTP Server. If you do not have access and believe you should, please contact the expedition coordinator.
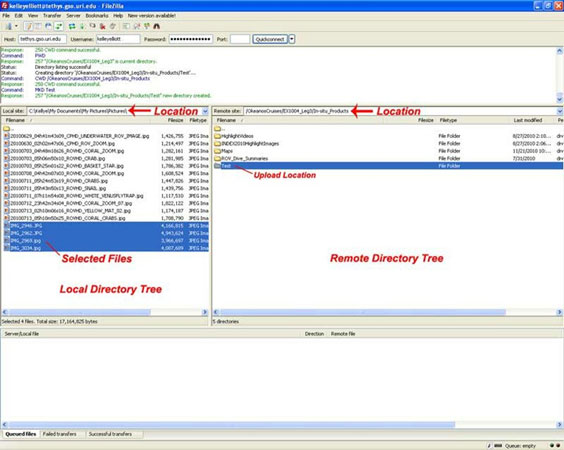
- Connect to the FTP site
- Find the file(s) you wish to upload by navigating to the file(s) location on the local directory tree
- Navigate to the location you wish to upload the file to on the remote directory tree
- Select the files you wish to upload from your local directory tree
- Left click your mouse and “hold” down
- Drag the files to your desired location on your remote directory tree
- Release the left-button on your mouse to “drop” the folders into your remote directory tree
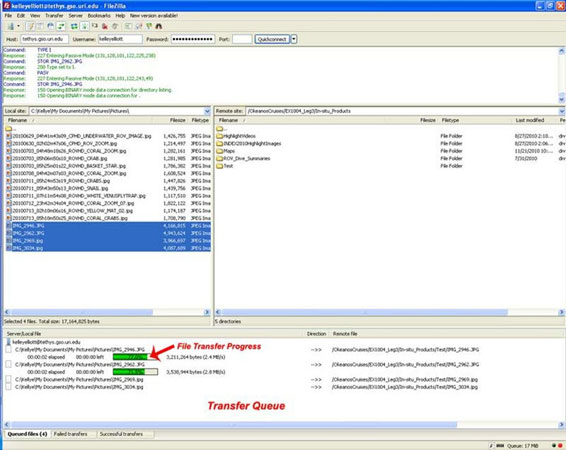
You can monitor the status of your files as they upload in the transfer queue window.


